
In this article, we will take a look at the soap making process we go through here at Botanie Soap. Whether you are getting ready to try your hand at soap making or you are just interested in what goes into making our organic soap bars, hopefully this inside look at our process will either prepare you, educate you, or both!
- Oatmeal Spice Ingredients
- Making and Pouring in to Molds
- Cutting and Curing
We are going to be following the creation of one our favorite bars here at Botanie Soap, Oatmeal Spice. I will give you a description of each ingredient that goes into Botanie Soap’s Organic Oatmeal Spice Soap Bar (sodium hydroxide is also a required ingredient but I will not be talking about it here as its use in the soap making process is pretty straight forward).


Ingredients
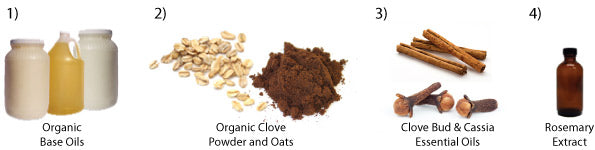
1. Organic Base Oil Blend
Organic Sunflower/Safflower – With fatty acid levels very similar to those of olive oil, our sunflower/safflower blend is high in oleic fatty acids. These are the fatty acids which provide the wonderful conditioning properties you find in cold process soap. Both oils make the bar moisturizing by allowing the soap to leave behind its emollient content, which helps the skin retain moisture.
Organic Palm Fruit Oil – A long-lasting bar is important, and this is where palm oil comes in. At proper levels, it provides a nice bar hardness which allows the soap to last rather than get soft after only a few uses. Palm oil also contributes its own conditioning properties and provides a nice, creamy lather.
Organic Coconut Oil – What is the main purpose of soap? To clean, of course. This cleaning property is exactly what coconut oil provides. It is the cleansing coconut oil that grabs all those bad oils on skin, which, in turn, get washed away during rinsing. Along with cleansing the skin, coconut oil provides a bubbly lather. So, with the palm and coconut combination, a nice lather, which is both bubbly and creamy, is created.
2. Organic Clove Powder and Organic Oats
To achieve both the color and the exfoliating properties of our Oatmeal Spice bar, we first use organic clove powder. The clove powder not only gives the bars their nice, light brown color, but it also contributes a mild spice scent. We then add in both ground and whole organic oats, which provide a lovely exfoliating characteristic.
3. Clove Bud And Cassia Essential Oils
What makes our Oatmeal Spice bar smell so much like a cookie waiting to be eaten? That would be a perfect blend of clove bud essential oil and cassia (cinnamon) essential oil. We never use fragrance oils in any of our soaps, as they are synthetics and can be damaging to skin.
4. Rosemary Extract
It’s never good to have a bar of soap go bad. That is where rosemary extract comes in to play. It is a natural preservative that boosts the shelf life of bar soap, allowing each bar to last until somebody is ready to use it.
Combined in the right amounts, the above ingredients create a wonderful Oatmeal Spice bar that is durable and long-lasting, moisturizing, and cleansing. One that looks and smells great, too!
The Actual Soapmaking Process
As for the physical combining and stirring of the ingredients, our process is similar to the one used in our soap making kits, except it is done on a larger scale with appropriate equipment. First, we combine our proprietary base oil blend with our sodium hydroxide/water (lye/water) solution and stir them together. Next, once trace is reached (the point at which, when drizzled, the soap just begins to pile on the surface before sinking back in), we mix in our essential oil blend and herbal additives to create the wonderful scent and color. Last, we pour the soap into our molds and let it sit for about 48 hours, allowing the continued reaction to take place and the soap to harden. The following section shows the molds we use to hold the soap.
The Mold Process
Mold Preparation – Before we pour the soap into our mold, we first line the inside with parchment paper. This greatly reduces adhesion to the mold interior, allowing us to disassemble the mold without too much effort. A poorly lined mold can result in difficulty disassembling and/or dents or scratches in your soap. In our detailed soap making guide, we used empty milk cartons that have a waxy lining. For small-scale soap making, milk cartons or something similar work great.
Completely Filled Mold – Once the mold is filled completely, the soap can continue to complete its reaction. The soap will sit for about 48 hours, during which it will go through what is called a “gel phase.” In this phase, the soap will temporarily turn somewhat transparent while the reaction completes. The soap is left alone for the remainder of the 48 hours so it can cool and harden. Once cooled, the block of soap will be ready to be cut into individual 4 ounce bars.
Covering the Molds – Before we can let the soap sit and complete its necessary reaction, we need to first take cleanliness measures. In order to make sure we keep a “clean house,” we cover the top of the soap-filled molds with a large piece of plastic wrap before leaving the soap to do its thing. This prevents spillage while transferring the molds to their storing location and also keeps dust and dirt particles from gathering on the top of the soap. Once transferred to a temperature controlled room, the soap will continue the saponification process and be ready to cut within 48 to 72 hours.
Partially filled Mold Lined with Parchment Paper

Mold Filled to the Top

Mold Covered with Plastic Wrap

Our Cutting and Curing process
Because we at Botanie need to produce large quantities of high-quality bars, we use a wire cutting press to cut the large soap blocks we take from our molds into individual bars. This press is accurate and efficient, allowing us to dramatically increase our bar output while ensuring all our bars maintain the quality and characteristics of handmade soap.
The first step in our cutting and curing process is to disassemble our mold and peel the parchment paper away from all sides of the block of soap. If you look back to part two of this series, you will remember we put the parchment paper into the mold before pouring in the soap in order to make it significantly easier to remove the sides of the mold at this point.
Once the soap block is removed from the mold, it is placed under our first cutter and we begin the cutting process. The first cut divides the soap into loaves measuring 12 inches by 3.5 inches by 2 inches. This cut also takes off about 1/8 to 1/4 of an inch of soap on all sides, leaving very clean edges all around the loaves.


Next, two rows of loaves are stacked length wise two-three loaves high on a second cutter. This second cut slices each loaf into 12 individual, organic four-ounce bars each measuring 3.5 inches by 2 inches by 1 inch. Finally, each bar is placed on a drying tray to cure (harden) for about three to four weeks. This last step is very important, as bars that have not cured for a proper length of time will have drastically shorter lifespans than those that have.


The final result is a batch of naturally scented bars made with 85% organic ingredients!